How to Hit a Driver Consistently for More Fairways in Regulation
Learning how to hit a driver consistently was arguably the greatest struggle I’ve endured in golf.
However, after years of coaching, trial, and error, I found that my posture, wrist extension, and excessively flexible shaft were the root cause of my quagmire.
After reading this review on how to swing a driver consistently, you’ll know where to position the ball and what posture and wrist angle to induce.
In addition, I’ll explain how opening my feet, relaxing my grip pressure, and adjusting the tee height can transform your tee shots.
Ways to Hit a Driver Consistently – In Short
- Create spin angle and flexed knees for optimal rotation and control.
- Turn your feet outwards to allow for increased backswing rotation.
- Reduce grip pressure to enhance wrist hinge and clubface control.
- Align the ball with your front heel to account for the longer shaft length.
- Adjust the tee height to match your attack angle for a clean strike.
- Shorten your backswing for greater control of the clubface.
- Move your wrists towards flexion at the top to help shallow the shaft on the downswing.
- Shift your hips to initiate the downswing to avoid casting and swinging inside.
- Rotate your shoulders through impact to generate lag and square the clubface.

Drive with confidence! Master wrist mechanics using our comprehensive online resource.
Contents
- Common Causes of Hitting a Driver Inconsistently
- 9 Tips to Hit a Driver Consistently
- 1. Adjust Your Tee Height
- 2. Create Spine Angle and Flex Knees
- 3. Turn Your Feet Out (Trail Foot to Optimize Rotation on the Backswing)
- 4. Reduce Grip Pressure
- 5. Ball Aligned with Front Heel
- 6. Shorten Your Backswing
- 7. Move Wrist Towards Flexion at the Top
- 8. Shift Hips to Initiate Downswing
- 9. Rotate Your Shoulders Through Impact
- Summary
Common Causes of Hitting a Driver Inconsistently
In my experience, I’ve found 6 common causes for golfers to deliver inconsistent driver swings.
For starters, players operate with equipment ill-fitted to their swing, while an undesirable posture restricts rotation and clubface control.
Finally, excessive wrist extension at the top of the swing and insufficient hip and shoulder turn.
Incorrect Equipment
Strong Driver Loft
Modern strong lofted drivers are built to minimize spin and accelerate ball speed, but they require a fast swing speed to tame it.
I often notice moderate or slow swing speed amateurs swinging a 9.5-degree driver, and they struggle to get it airborne, losing distance and control.
A simple solution is to test a 10.5 or 12-degree driver to see which option you launch more consistently and achieve optimal distance.
Stiff Shaft
The second equipment issue I notice is excessively stiff shafts for the accompanying swing speed.
These shafts provide limited spring assistance into contact, resulting in reduced energy transfer and ball velocity, which prompts a weak, low launching strike.
My swing speed tops out at 85 mph, and I produce the best results with a regular flex shaft. However, you may consider the softer senior flex shaft, which features a low kick point to deliver an elevated launch if you swing a driver below 83 mph.
Bad Posture
One of the core reasons my driver game was erratic stemmed from my hunched-over torso. It restricted my ability to rotate on the backswing and keep my club on path and plane.
My lack of rotation on the backswing got me into a position at the top, where I was forced to cast the club to get down to impact.
Following this path caused my club to travel from the outside to inside with an open clubface, which cut across the golf ball and sliced into trouble.
Scroll down to my tips on how to swing your driver consistently to understand how to achieve optimal posture.
Lack of Rotation on the Backswing
A lack of rotation on the backswing limits your ability to wind up your club all the way to the top of your swing.
Naturally, this prevents you from unloading on the downswing with accelerated speed and increased power for a high-flying, long tee shot.
The other issue with rotation is you struggle to get your clubhead into the optimal position at the top of the swing, causing you to maneuver your wrist angles.
When you start manipulating other aspects of your game, it throws your mechanics off, and you lose control of the clubface.

Backswing Wrist Extension
Backswing wrist extension was my other pitfall off the tee box. I was forced to extend my wrists towards the top of the swing. The wrist extension helped me increase my backswing and send the clubhead as far back as my lead shoulder.
I thought that lengthening the backswing would help me rectify my loss of power stemming from minimal rotation, but it didn’t.
Instead, it pushed the clubface open at the top and caused me to swing on an out-to-in path, eventually producing a sliced shot.
Limited Hip Turn
Another mistake I see golfers make is reducing their hip turn on the backswing and relying on the shoulders and arms.
By eliminating hip rotation, you reduce your coil on the backswing, which is what helps you to build up energy all the way to the top and unload on the way down.
Without hip turn, you are forced to turn to your wrist extension to increase the length of your backswing.
As I previously explained, wrist extension at the top will pop the clubface open and generally cause you to swing out to in and slice the golf ball well right of the middle of the fairway.
Lack of Shoulder Turn Through Impact
The final reason I see amateurs struggling to swing a driver consistently is the direct result of insufficient shoulder turn through impact.
When you stop rotating your shoulders through contact, you risk leaving your body and the clubface open to the path and slice your golf shot.
It’s imperative to keep turning your shoulders through impact to generate lag, power, and square the clubface up for a straight golf strike.
As a simple exercise, I encourage you to grab a pitching wedge and set up for a shot without a golf ball.
On the first swing, stop rotating your shoulders through impact, freeze in that position, and check where your body and clubface are pointing. It should be facing to the right of your target if you’re right-handed.
Next, turn your shoulders through impact until your clubface is square to the target and your body is parallel to the mark.

9 Tips to Hit a Driver Consistently
1. Adjust Your Tee Height
The first step to hitting your driver consistently is to tee your ball up to the ideal height for your angle of attack.
Meandmygolf explains that you must strike the ball slightly above the center of the clubface to generate a high launch angle and low spin rate.
It’s easier said than done, as amateurs tend to generate erratic tee shots by following the 1.5-inch rule religiously.
I was also taught that the optimal tee height is 1.5 inches off the ground. However, I’ve learned to alter the position to my preference over time.
If you swing with a steep angle of attack like I once did, you may strike the tee if your ball is teed up by 1.5 inches. This balloons your ball into the air with limited forward momentum and immediately falls down to earth.
I found the solution was to tee my ball down slightly more to match the center of the clubface position at contact.
Conversely, golfers who enjoy a shallow angle of attack should tee the ball higher, enabling you to catch the sweet spot as you commence your upswing.
To find your optimal tee height, take a few practice swings and pay attention to where the angle of the clubface is at contact.
If the ball aligns marginally above the center of the clubface, you’re ready to hit. If the ball is too high for the clubface, tee it down. Or, tee it up if the ball is lower than the sweet spot.
2. Create Spine Angle and Flex Knees
Your next mission is to moderately angle your spine and flex your knees. I picked up this advice from Australian PGA Professional Brian Fitzgerald some years back, and it’s worked a charm since.
I start by standing upright and feel the weight more concentrated in the front of my feet, boosting my freedom of movement on my backswing. From the upright position, I bend my spine slightly forward and flex my knees until I feel comfortable and balanced.
Next, I approach the ball and attempt to replicate this position. If I find myself too hunched over, it often means I’m standing too far from the golf ball and need to readjust.
Conversely, if my spine is too upright, I’m standing too close to the ball, restricting my arm movement and shoulder turn on the backswing.
I can commence my backswing once my spine has the correct angle of tilt, my knees are flexed, and I am balanced.
Inducing the desired posture helps me keep my club on plane and turn my shoulders to build up energy on the way to the top.
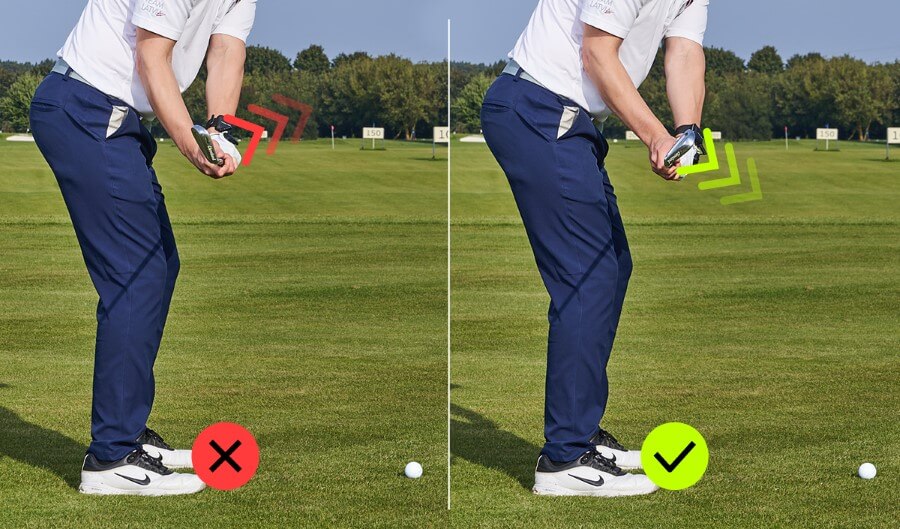
3. Turn Your Feet Out (Trail Foot to Optimize Rotation on the Backswing)
I find that turning my feet outwards off the tee is a simple way to promote increased freedom of movement.
It helps me produce an extra element of turn on the backswing to increase my power to the top. When I try swinging with my feet facing inwards, I feel restricted and unable to produce that additional rotation towards the top.
Generating maximum energy of your backswing is vital to accelerate clubhead speed and power into impact.
If you lose power before you reach the top of your backswing, you have nothing to unload on the way down, resulting in a slower swing speed and a loss of distance.
To turn your feet outwards, angle your front foot slightly to the left for right-handers and the opposite direction with your back foot.
Leading European PGA instructor Rob Cheney highlights how to turn your feet outwards if you require a visual demonstration.
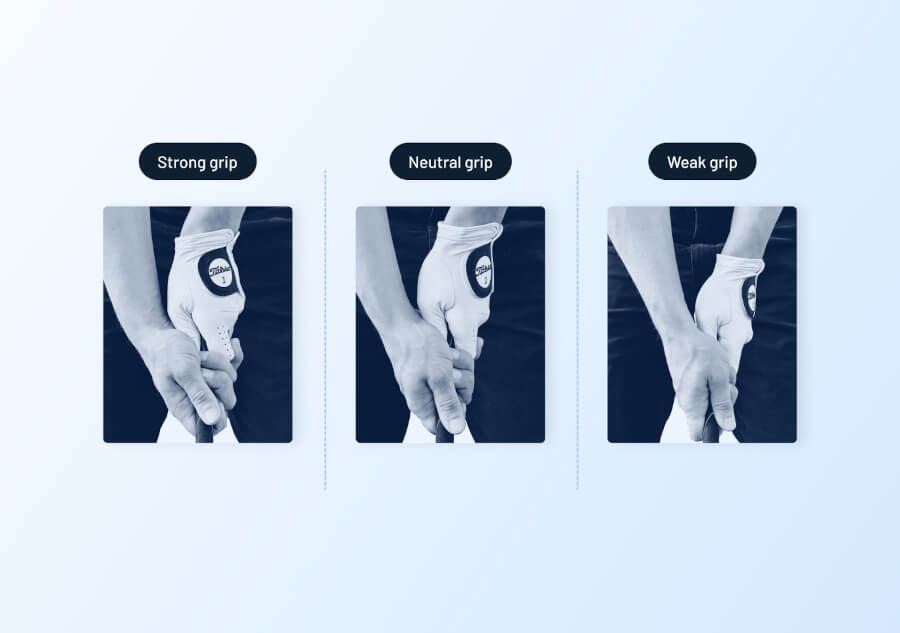
4. Reduce Grip Pressure
I’ve fallen victim to the trap of gripping my driver with excessive force, hoping that I’d bomb a drive like Kyle Berkshire. Don’t do it.
Tight grip pressure restricts your control because it tenses your shoulders and arms and minimizes your ability to guide the club on plane.
The lack of shoulder turn on the backswing hampers your ability to get your hands and club head to the desired position at the top.
You call in a favor from your wrists and ask them to extend as you near the top, increasing the length of your backswing. This opens the clubface, rendering it impossible to close as it strikes the golf ball.
The first step I take when I get to the range is identify my optimal grip pressure. I start by strangling the club as hard as possible and hit a few shots with this setup to memorize the feel, positioning, and shot results.
Next, I release my pressure until the club almost falls out of my hand, and I repeat the process of hitting a few shots.
Finally, I search for a happy medium using my knowledge of tight and weak pressure. When I am satisfied, I start my practice session.
5. Ball Aligned with Front Heel
Once your fundamentals check out, address the ball and set up for your shot. Align the ball with the inside of your front heel to account for the added length of your driver shaft.
In addition, the forward ball position encourages you to strike the golf ball on the upswing, sweeping it into the air.
If I position the golf ball too far back in my stance, I will hit down on the golf ball, requiring rapid clubhead speed and energy transfer.
Most amateurs cannot combine these factors, resulting in a weak shot and a yardage loss.
On the contrary, some amateurs go overboard and place the golf ball outrageously forward. If the golf ball is teed up past your front foot, you’ll have to reach for the ball and risk topping or delivering an air shot.
Before you commence your backswing, draw an imaginary line from your golf ball back to you, and determine where it leads.
You’re ready to swing if it aligns with your lead inside heel. However, if it’s too far forward or back, adjust the position accordingly.
6. Shorten Your Backswing
Shortening my backswing has aided my accuracy tremendously off the tee, as I can better control my plane and path.
In addition, it minimizes my wrist extension at the top to prevent me from overswinging and opening the clubface.
My wrist extension and open clubface subsequently caused me to swing from outside to in and cut across the ball. The result was a pull slice, leaving me in an undesirable position, rendering the hole long and frustrating.
To overcome this mess, I merely take my clubhead ¾ of the way back and delay taking it inside.
This enhances my control of the clubface and helps me get it as far from the impact zone as possible.
Once my clubhead reaches the ¾ mark, I initiate my downswing and let the club fall into place as I shallow it leading into impact.
Naturally, shortening my backswing has cost me distance off the tee compared to my days of full swings.
However, I’ve hit significantly more fairways since employing this tactic, and my misses aren’t catastrophic. I’d far rather be in play and have a shot at hitting the green on approach than wasting my time searching for my ball.

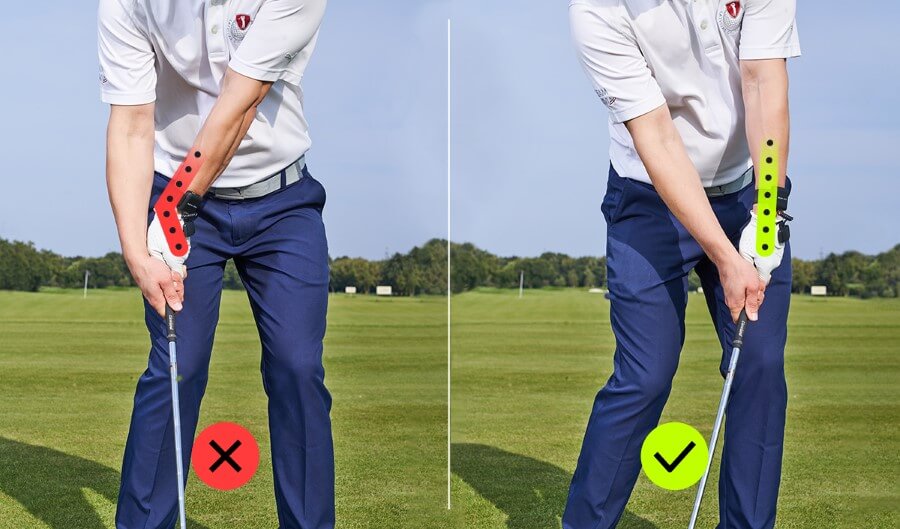
7. Move Wrist Towards Flexion at the Top
As I’ve explained, wrist extension was one of the root causes of my inaccuracy and erratic ball striking off the tee.
The added extension caused my clubhead to travel further back than usual in my swing, making up for a lack of rotation and wind up on the backswing.
In addition, extending my wrists forced the clubface open at the top and made it difficult to square it into impact. The most common outcome was a sliced tee shot that ended deep in the woods, rough, and occasionally, out of bounds.
I fixed this issue with the guidance of the HackMotion wrist sensor, which trained me to induce more flexion towards the top.
I found that flexing my wrists kept the clubface closed, making it easier to square it into impact.
I have a simple drill to better understand how wrist flexion and extension impact your clubface angle.
Hold your hand out in front of you with your palm facing the ground. Push your fingers down towards the earth to flex your wrists, then turn your hand clockwise until your palm faces the intended target ahead of you.
Notice how your palm is closed to the target, which is the optimal position you want leading into impact.
Conversely, when you hold your hand out in front of you and raise your fingers to the sky, you’ve created wrist extension.
Now, turn your palm clockwise until it faces toward your target, and notice how your wrists are open to the intended target.
If you leave your wrists extended into impact, you’ll keep the clubface open and possibly slice your golf ball.

8. Shift Hips to Initiate Downswing
The penultimate tip on how to swing your driver consistently is to commence your downswing by shifting your hips.
When you reach the top of your backswing, you should feel more weight on your trail side, which is where you store your energy to unleash on the downswing.
From the top of the swing, I want you to start shifting your weight towards the front leg to create forward momentum. That momentum will then get your shoulders turning, which maximizes power, lag, and control of the clubface on the downswing.
However, I notice many amateurs struggle with the sequencing of shifting their hips and turning their shoulders.
Instead of initiating the transition with the hips, I see players relying heavily on their arms and shoulders to get the club down to the golf ball.
When your swing is all about the arms, you lose power, but you also tend to cast the club on the downswing.
The lack of hip rotation makes it impossible to control the clubface and shallow the shaft, causing you to cast your club and attack the ball on a steep angle with an open clubface.
9. Rotate Your Shoulders Through Impact
Finally, rotating your shoulders through contact is vital for your clubhead speed, power, and accuracy off the tee.
By turning my shoulders on the downswing, I generate lag and enjoy greater control of the positioning of the clubface as it strikes the ball.
Ultimately, by producing a desirable shoulder turn through the downswing, I find myself making cleaner contact with the ball, increasing compression, and enjoying increased yards.
When I stop turning my shoulders through impact, I lose swing speed, power, and the ability to square the clubface at contact. The most common outcome is leaving my clubface and body open to the target when I strike the ball, sending it significantly right of the target.
The next time you take a driver practice swing, pay attention to where your shoulders are at impact. If you find them open to the target, increase your turn rate to square them up at contact.
I often use the skipping stones drill to work on my shoulder turn and keep my torso flexible. You can use a rebound net if you don’t have the luxury of a nearby lake.
I take a few stones and try to skip them as many times as I can across the water, using nothing more than my wrist hinge and shoulder turn.
Learn wrist mechanics and achieve consistent drives with our online course.
Summary
A driver is the longest and largest golf club in our golf bag. However, it’s challenging to control despite the added surface area.
Adjusting your tee height, standing moderately upright, and promoting maximum rotation is a perfect starting point for learning how to hit a driver more consistently.
In addition, remember to keep your ball aligned with the inside of your front heel and minimize wrist extension towards the top.
Optimizing your wrist angles using the HackMotion swing analyzer will help you control the clubface to generate superior accuracy and consistent distance off the tee box.