The number one reason why your ball goes left or right is the angle of the clubface at impact.
The golf clubface controls more than 80% of the shot direction.
HackMotion helps to increase consistency in how the golf club is delivered to the ball. Lead wrist extension and flexion will be the key factors that you focus on throughout this unit.
Again, you must remember that there is no perfect wrist angle to achieve; instead, analyzing this data and getting as close to the recommended parameters as possible is the best use of the HackMotion.
This is chapter 1 in
Contents
1. Learning The Role of The Wrists in The Golf Swing
We will break down how lead wrist extension and flexion influences the clubface, what poor mechanics look like, and what correct numbers could look like.
2. Improving Wrist Control In Your Swing
Once the basics of wrist mechanics are understood, it’s time to implement them into the golf swing. Here we will focus on what you need to think about when you swing, how you can know if your wrist motion is improving, and drills to make performance on the golf course easier.
3. Analyzing and Interpreting Results
Part of what makes HackMotion so beneficial is that it is a tool you can use to check on your progress continually.
Learning The Role of The Wrists in The Golf Swing
The clubface determines more than 80% of the shot direction. The wrist angle and wrist position have a direct impact on the clubface angle at impact.
HackMotion will make it easier to understand things like lead wrist extension and flexion; however, it’s important to remember that wrist angles change from player to player. There is no magic number that we are striving for here.
Instead, tour player data is used to help you follow patterns and create consistency in your golf game. We know there is a right and a wrong way to position the wrists throughout the golf swing, and soon you will see where you stand.
How Lead Wrist Extention/Flexion Influences the Club and Clubface
To start out, we need to look at the difference between wrist extension (cupping) and wrist flexion (bowing).
For a Full Guide on Wrist Movement, Click HERE.
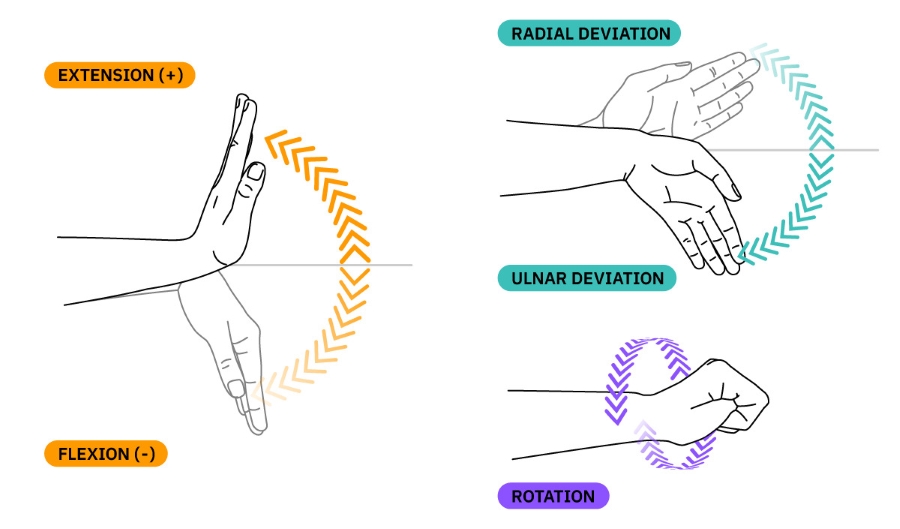
Here is an illustration of wrist flexion (bowing); it works the same for lead and trail wrists.
Now, most importantly, what matters is how these motions affect the golf club.

- More wrist extension will open the clubface, pointing it up and to the right of the target.
- More wrist flexion will close the clubface, pointing it downwards and to the left of the target.
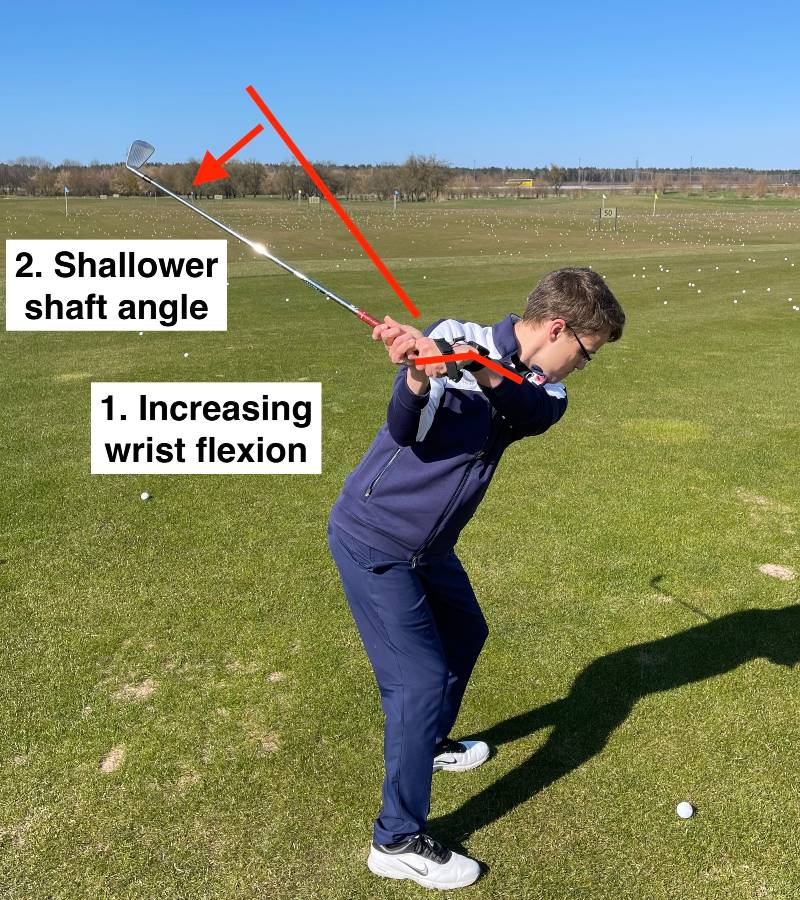
More wrist flexion in transition (from backswing to downswing) will shallow the club out.
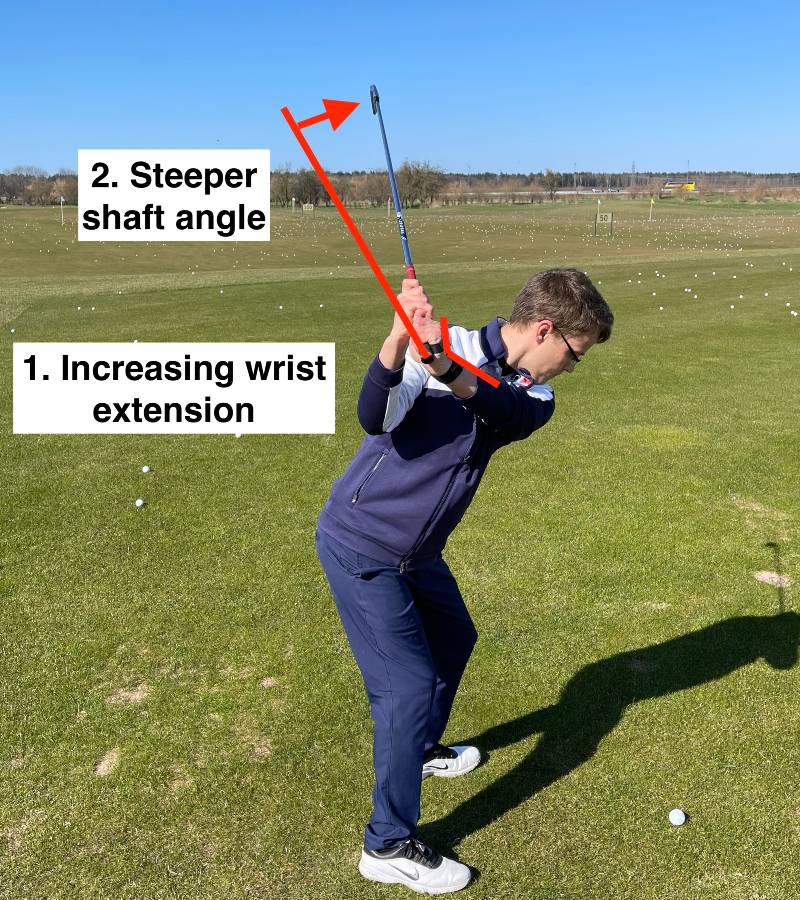
More wrist extension in transition will steepen the club.
Next, watch this video by PGA TOUR Coach Jeff Smith, where he explains the basics of wrist angles and how they affect the club.
Note how he explains the difference between typical amateur golfers “pulling down” on the hand and extending (cupping) their lead wrist. Pro players are able to move towards flexion in transition and better control the club.
Here is a list of great free videos about wrist angles you should check out:
1. Andrew Rice on wrist angles:
2. Andrew Rice on getting better compression:
3. Rob Cheney wrists at the top of the backswing:
Why Does the Lead Wrist Matter?
As you will see throughout this game improvement pack, the lead wrist is the one we talk about most often. Lead wrist mechanics have a greater impact on the angle of the clubface than trail wrist mechanics.
In addition, most golfers have an easier time thinking about and feeling the position of their lead wrist as opposed to their trail list.
By manipulating the flexion or extension in your wrists, you directly change the angle of the clubface. Whether you are seeking power, accuracy, or consistency in your game, this will matter.
Typical Poor Lead Wrist Mechanics
There are various faults to look at with wrist mechanics, but excessive lead wrist extension seems to be the most common among club golfers.
For beginners, you will see too much change in extension/flexion, which leads to inconsistency in clubface control and shot direction.
The more you open the face, the more you must close it to hit it straight. Closing the clubface (from an open position) is hard to do consistently.
Backswing
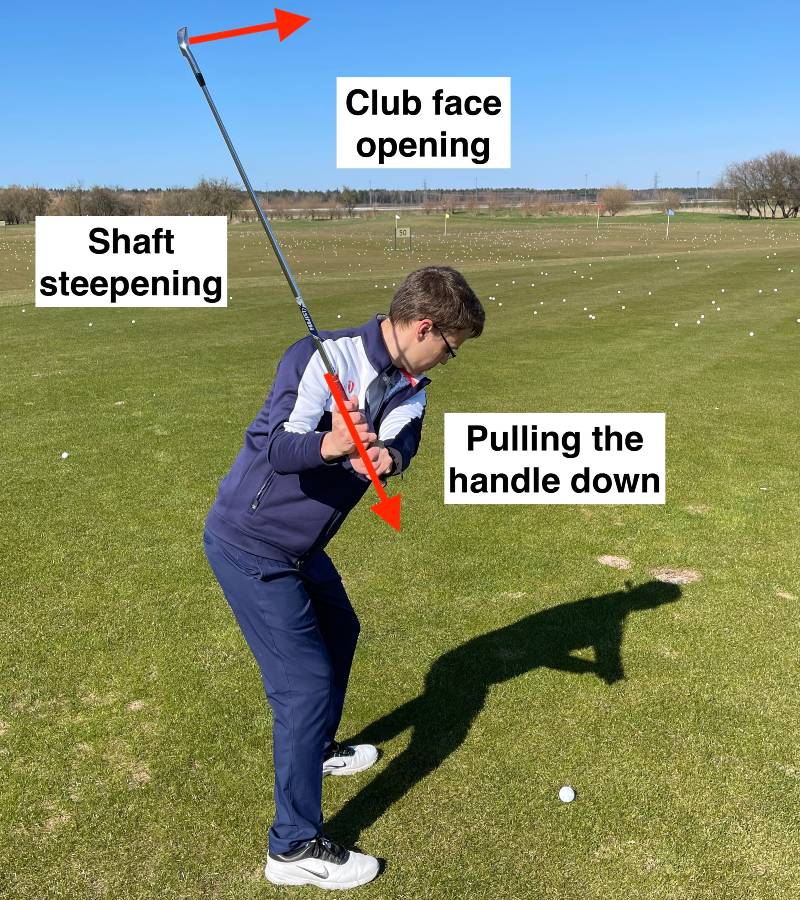
Notice that with too much wrist extension, the clubface is wide open at the top, making it quite a battle to get back to impact with something square. In addition, this position can limit mobility and create an elbow that flies away from the shoulder.
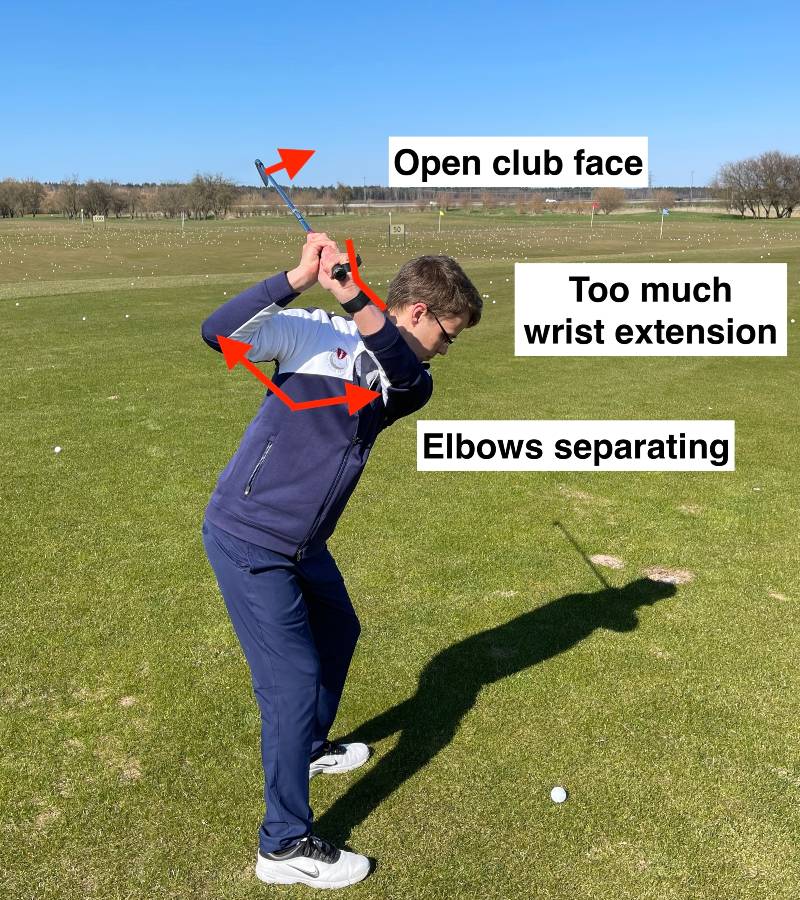
Downswing
A wide-open clubface at the top is a tough place to start. The player tries to compensate by pulling down on the handle and then working really hard with their hands to shut the clubface through impact. It’s not a consistent move. During this process, the lead wrist continues to extend, and the player’s swing path will be over the top. Sometimes you can see the lead wrist extension in the area of 50-60 degrees at this point in the swing.
Impact
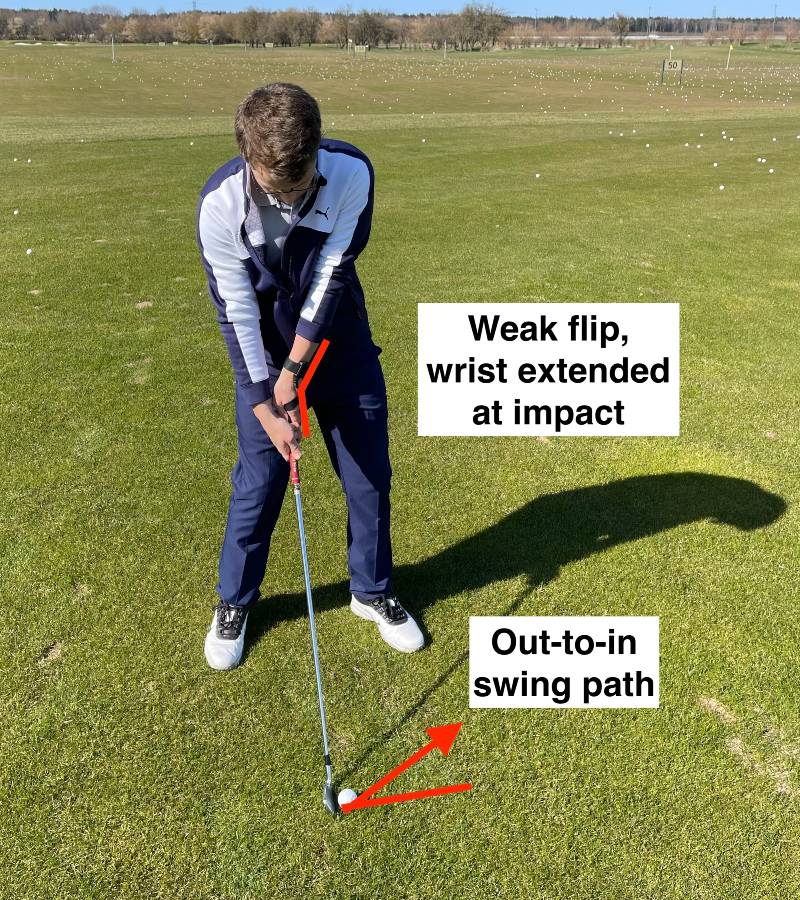
At impact, nothing is left to do but flip the clubface to try and square it. These are players that are scooping the ball up in the air, and the result will be a weak slice with too much loft and very little distance.
What Correct Lead Wrist Mechanics Can Look Like
We first must remember that there are no perfect wrist angles for all players and swings; your information is going to be unique to that of your friend or competitor. Your grip and individual swing impact your data.
For instance:
- Strong grips usually have about 30-45 degrees of extension at address; this extension continues to the top of the swing, where the clubface is likely slightly closed.
- Weak grips have around 0-15 degrees of extension at address; in addition, a weak grip will have more flexion at the top as opposed to extension.
- With a neutral grip, expect to see about 15-30 degrees of extension at address.
Some key parameters for amateur golfers to focus on include:
- How much extension was added from address to top
- How much flexion was added at impact compared to address.
Swing speed also plays into this equation, with golfers who have higher rotational ability having more flexion at impact and those with slower swing speeds having a bit more extension at impact.
Improving Wrist Control in Your Swing
Once the basics of wrist mechanics are understood, it’s time to implement them into the golf swing. Here we will focus on what you need to think about when you swing, how you can know if your wrist motion is improving, and drills to make performance on the golf course easier.
What to Focus on When Working to Improve Clubface Control?
The best way to improve wrist control is to focus on flexion and extension. The three positions we recommend are the address to top, transition to downswing, and impact.
- Address to Top – Not increasing extension too much from address to top of the backswing. Avoid opening the clubface. Tour players are usually in the range of -10 to +5.
- Transition – During the transition, smoothly decrease the amount of wrist extension. Do not aggressively pull on the handle since this will open the clubface and steepen the shaft. Gradually square the clubface to the target.
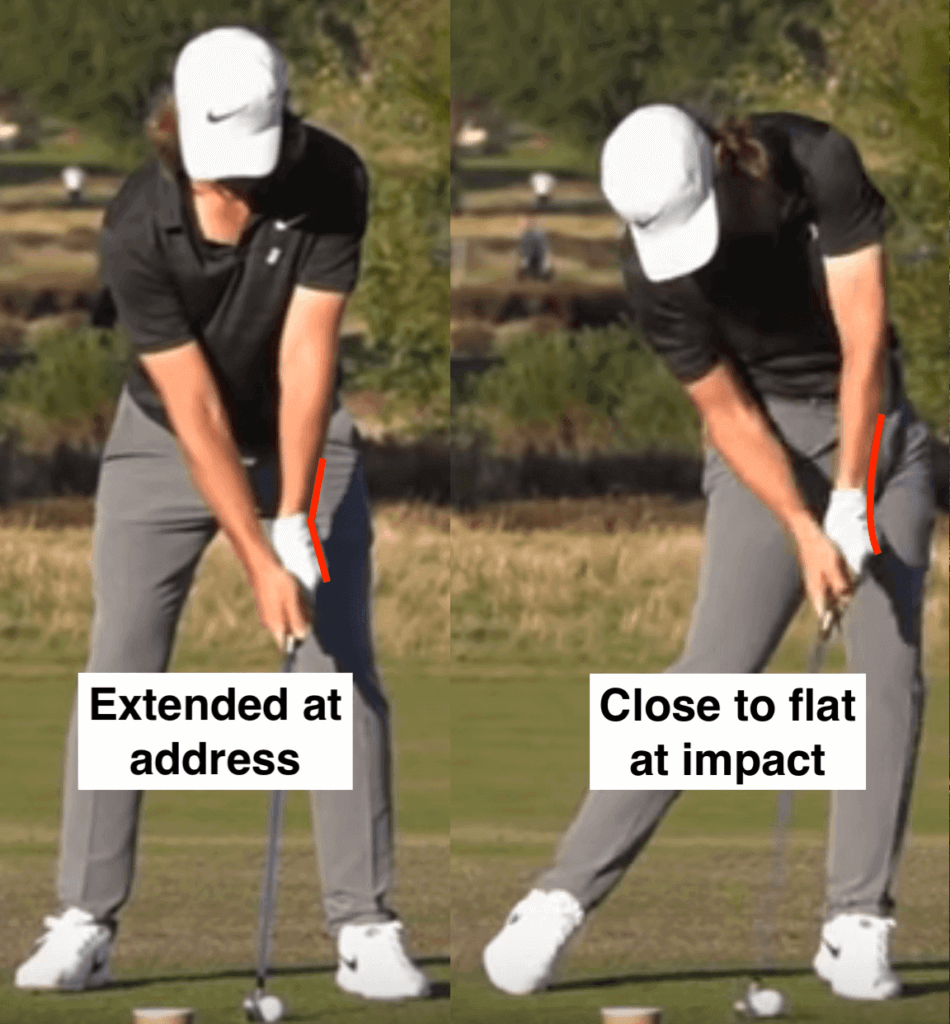
- Impact – Tour players are usually around 15-30 degrees less extended (more flexed!) at impact than at address. This is normal when you have shaft lean. The precise amount of extension will depend on the grip. Strong grips with more extension at address will also be more extended at impact. This is normal, as not all impact positions are the same.
Wrist Angles with Different Clubs
The wrist mechanics required for a driver are not the same as those for a wedge due to the differences in swing dynamics, club length, and the desired shot outcome.
A driver swing typically involves a sweeping motion with a shallower angle of attack, while a wedge requires a steeper, more downward strike to produce the necessary spin and control.
Here’s how wrist action changes when you switch clubs:
| Club | Wrist Extension/Flexion | Swing Dynamics |
|---|---|---|
| Driver | Neutral wrist position at address, slight extension (cupping) at the top, flexion (bowing) or flat wrist through impact | Wider, circular swing path, reduce spin for max distance |
| Irons (Mid to Short) | More flexion at the top, increased flexion through impact | Steeper swing path, emphasize precision and distance control |
| Wedges | Significant flexion at the top, maintain flexion through impact | Steeper angle of attack, maximize spin and control |
| Putting | Minimal wrist movement, pendulum motion with shoulders | Controlled, precise stroke, straight-back and straight-through motion |
Poor Player Flexion/Extension Pattern and Data Analysis
Your HackMotion will notify you when your flexion/extension pattern is incorrect.
Here are the things that amateurs do that cause them issues:
Extension being added during the backswing
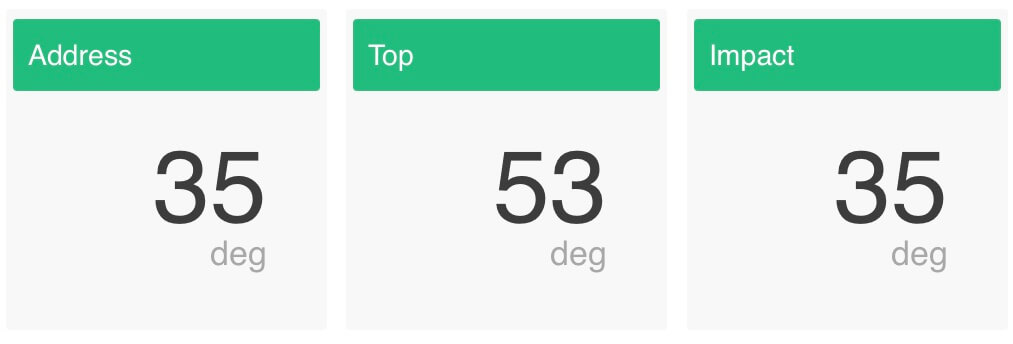
Adding extension during the backswing, as seen here, will open the clubface. The problem then becomes having to square the clubface up from the top to the impact position. Perfect timing, and a late flip of the wrist angle is needed, a move that is hard to repeat consistently.
Not decreasing extension from address to impact
As you can see in this example, the extension at address is the same as impact. With the extra extension that was added, this is not a surprise, but it leads to an impact position with no shaft lean. The result is a high launch angle, loss of distance, and no control in the swing.
Tour Player Flexion/Extension Pattern and Data Analysis
The main difference between tour players and amateurs is the clubface control. Pros have better wrist mechanics. Amateur players often have a considerable amount of change in their extension/flexion amounts, while tour players keep it much more under control.
Address to top position are similar
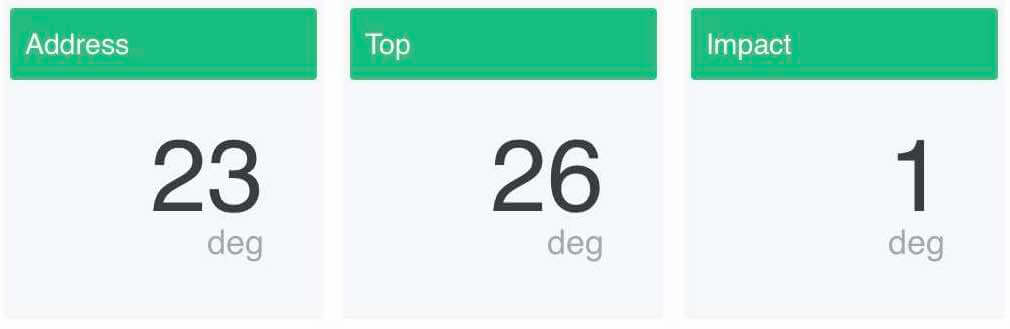
The extension from address to the top is very close to the same. Compared to the amateur example, this is 15 fewer degrees of extension added, a considerable amount. At the top of the swing, the clubface is not nearly as open.
Impact position is less extended than the address
The pro has 22 fewer degrees of extension at impact than they did at address; this is impressive and gets impact back to a more neutral or square position. Decreasing extension from the address to impact and from top to impact are two common professional traits.
How to Improve Clubface Control using HackMotion
Now that you have identified your issues with clubface control, you can use HackMotion to help.
The first step is to measure your swing with HackMotion and develop a baseline.
Take 10 swings to see your flexion/extension pattern. Select the data from swings with your typical fault.
Focus on achieving better clubface control by controlling flexion/extension. There is not one set of “correct numbers” for all players but look for the pattern.
- ADDRESS TO TOP – Not increasing extension too much from address to top of the backswing.
- TRANSITION – During the transition, smoothly decrease the amount of wrist extension.
- IMPACT – Tour players are usually around 15-30 degrees less extended at impact than at address.
Next, you can use the HackMotion biofeedback drills to educate your hands on how to move. If you educate the hands, the body will generally follow. If your hands are making the right move and your clubface is in a good position, the body can rotate.
Once you spend time using the biofeedback tool, use HackMotion to record another practice session. Take a look at how these two data sets compare and see if you are headed in the right direction.
Drills Using the HackMotion Wrist Sensor
To get objective feedback and a feel for new movements, audio feedback can help. It provides a sound signal if you get into the correct position (that you set yourself).
Max Extension and Neutral Drills
Below, you can watch coach Monte Scheinblum demonstrate 3 drills he likes to use with HackMotion biofeedback:
- Drill 1: max extension 20°;
- Drill 2: neutral 0° at the top;
- Drill 3: flexion -20° as the first move in downswing.
Underload The Wrists with No Thumbs Drill
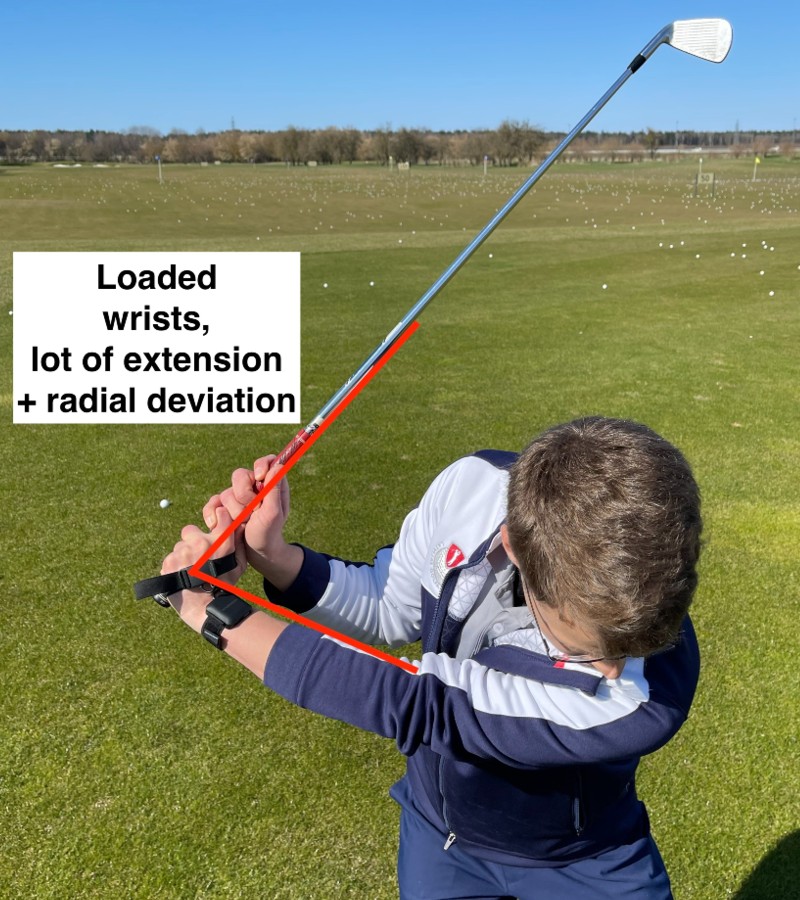
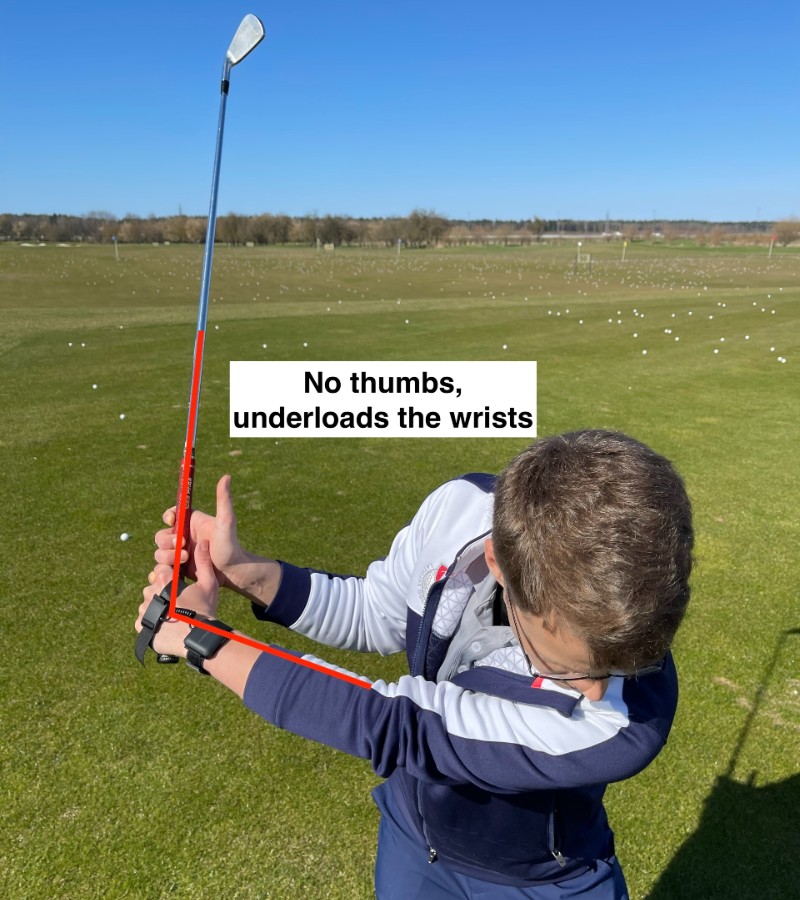
Often, the problem of too much extension and an open clubface is caused by overloading the wrists (too much radial deviation), trying to “lag” the club. To avoid overloading, do the opposite – “underload” the wrists.
The “No thumbs drill” is a great way to get a feel for underloading. Simply remove your thumbs from the grip and swing the club to get a feel for an underloaded transition.
Motorcycle Drill
The Motorcycle drill is another one that helps with extension and flexion, especially at the top of the swing.
At the top of the backswing, take your lead hand and pretend it is no longer on a golf grip but on a motorcycle grip. Feel the knuckles of your lead hand turn counterclockwise as you start your downswing.
This will give you the feel of closing the face earlier in your downswing. If you turn your knuckles but don’t keep rotating your body, you will hook the golf ball or start the ball well to the left of your target.
If you turn your body but don’t knuckle down enough, you will leak it to the right. You can learn it here!
Rob Cheney Drills
Rob Cheney uses the HackMotion to help his students hit better, straighter and more consistent golf shots.
Here are three drills you can use to get a more consistent wrist position and unlock more consistency in your game.
Analyzing and Interpreting Results
Part of what makes HackMotion so beneficial is that it is a tool you can use to check on your progress continually.
How to use HackMotion Biofeedback
Take a look at this video, where coach Al Davies uses HackMotion Sensor’s biofeedback to work on his swing fault.
Case Study – Tour Professional Improving his Clubface Control
Watch the presentation by PGA TOUR coach Jason Birnbaum (10 min) to see how reducing excessive lead wrist extension at the top of the backswing and in transition has benefited his tour player Roberto Díaz.
What to Focus on to Improve Clubface Control
Remember, wrist angles can be very different for each player. If you struggle with club face control, work on a stable extension/flexion pattern to improve it.
- Measure your swing and learn how to interpret the data from tour players.
- Work on drills that help you control the clubface and take advantage of biofeedback technology.
- Track your progress and compare new vs. old data to make sure you are progressing in the right direction.
What’s Next…
Now that you have all the information you need to work on clubface control and master the long game, it’s time to move to the putting green.
HackMotion Plus and Pro can be used to improve your putting stroke and achieve consistency on the greens.
In the putting game improvement pack you will:
- Understand how wrist and arm movement influence the putter’s face
- Identify your typical miss
- Practice wrist stability to improve consistency
- Learn how to use Biofeedback to get a feel for the correct motion
- Track your data and monitor your progress
- Get Exclusive content from professionals