What Should My Right Arm Do in the Golf Swing? (Understanding Your Trail Arm’s Role)
There is a lot of talk about the lead arm, lead wrist, lead side in the golf swing?
What about the trail arm? Or, for the right handed golfer, the right arm.
The right arm plays a big part in the golf swing, and it’s time that it got some attention. Our focus in this article will be the role of the right arm, or trail arm, in the swing.
The arm itself runs from your shoulder and down to the tip of the middle finger. With that in mind, the role of the shoulder, elbow, hand, and wrist in the right arm is what will be covered.
Note: As I reference the right arm, our lefty friends will, as you often need to do, flip this to make sense for you.
Understanding Your Trail Arm’s Role – Key Takeaways
Don’t have time to read my entire article? Here are the key points to remember.
- The primary role of the right arm is to bend and straighten. Bending in the backswing and straightening on the downswing as you approach impact.
- The right arm will be slightly bent in set up and close to your body. At the top of the swing, it will be bent at roughly 90 degrees.
- On the downswing, it will remain slightly bent as it starts to straighten and extend. In a correct swing, the right, or trail arm, should not reach full extension until slightly after impact.
- The role of your right shoulder is to rotate back on the backswing, and through on the downswing.
- The role of your right wrist is to control the clubface of your golf club.
Contents
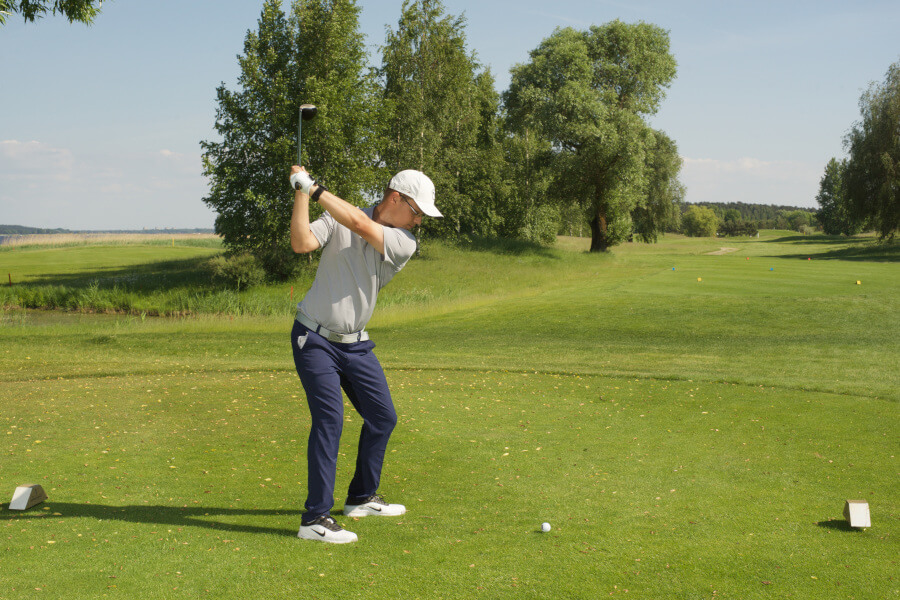
The Right Arm at Set Up
The right arm at setup needs to be positioned in such a way that you will be able to take the club back correctly in the backswing.
Often, golfers will downplay, or not emphasize the importance of the pre-swing fundamentals enough.
After all, at this point, you are stagnant and not yet moving.
The reality is that how you set up, from your grip, stance, ball position, and all the other pre-swing fundamentals, will have a direct correlation to how well you can hit the ball.
As we focus on the right arm, I want to break things down by each individual segment of it. The right hand and wrist, right elbow, and right shoulder.
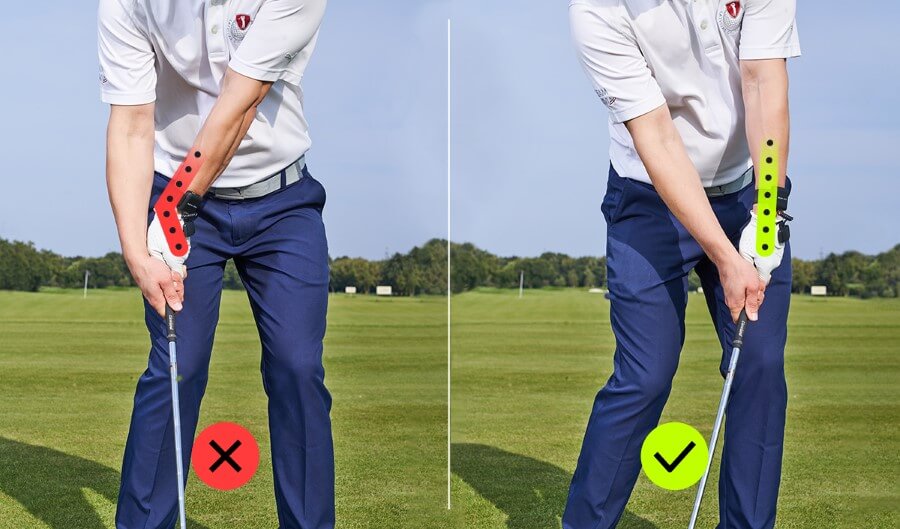
Right Hand and Wrist
When set up, the right hand and wrist will be in extension.
This will help support the left or lead hand as it is in a relatively flat position.
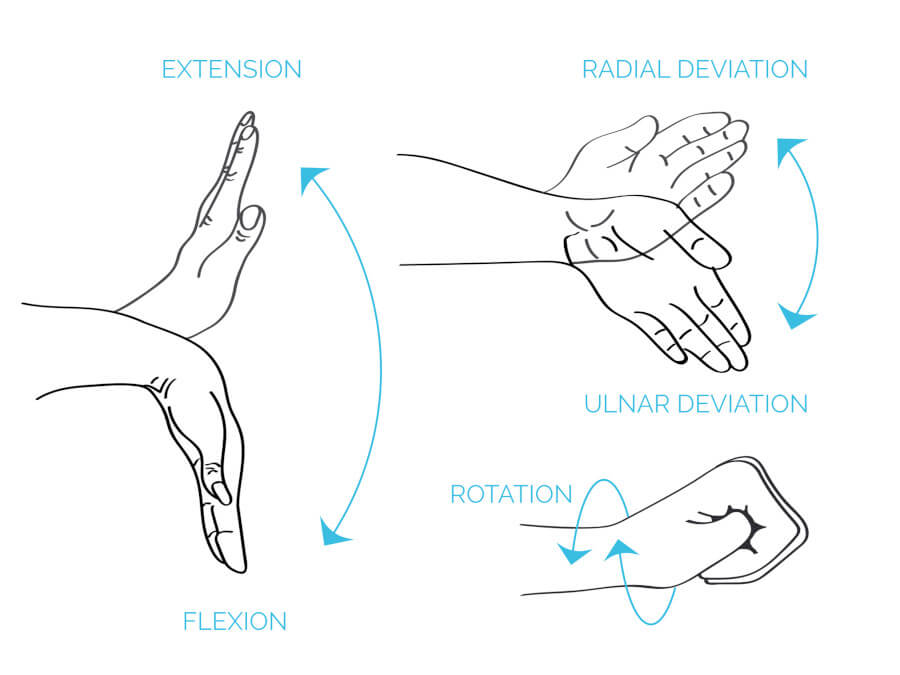
The following image from HackMotion is a refresher on the wrist and hand in the golf swing and how it moves.
Although all three ways the right hand moves are taken into consideration in the golf swing, the wrist extension/flexion is going to be the most important to remember.
Right Elbow
The right elbow at address is slightly flexed.
Much like with the role of the right hand to support the left hand, the right elbow does the same for the left arm. The left arm will be relatively straight in set up.
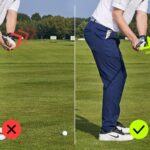
A good checkpoint at setup is having the right elbow pointed at the right hip.
You also want to have the right elbow pocket or the inner side of the elbow pointing towards the camera if you were being recorded from face on.
Do not let that elbow pocket face in towards your body.
Right Shoulder
At set up, the right shoulder should be ever so slightly lower than the left. As the club gets longer, with a driver, for example, this slight shoulder tilt will increase a bit.
Some golfers overdo this in set up and get the right shoulder set too low. Remember, this is only a slight tilt of the shoulders back. Exaggerating things in the golf swing doesn’t typically end well.
The shoulders should be parallel to the left of your target line as well in the set up.
A final thought about set up.
You need to feel relaxed in the set up. In fact, the positioning of your right arm, wrist, and shoulder will be much easier to repeat if you can let go of some of the tension.

Take control of your golf game by learning wrist mechanics with our FREE online resource.
The Right Arm on the Backswing
As we start to move the club back, the right arm plays a very important role in setting us up for success at impact. Even that first move away from the ball (if done correctly) can set you up for a solid impact position.
If you indeed take the club back with the right arm functioning properly, you start to limit the potential for error.
The main thing to remember with the arms in general, is that they need to stay connected to the body. Your right arm plays a significant role in staying connected.
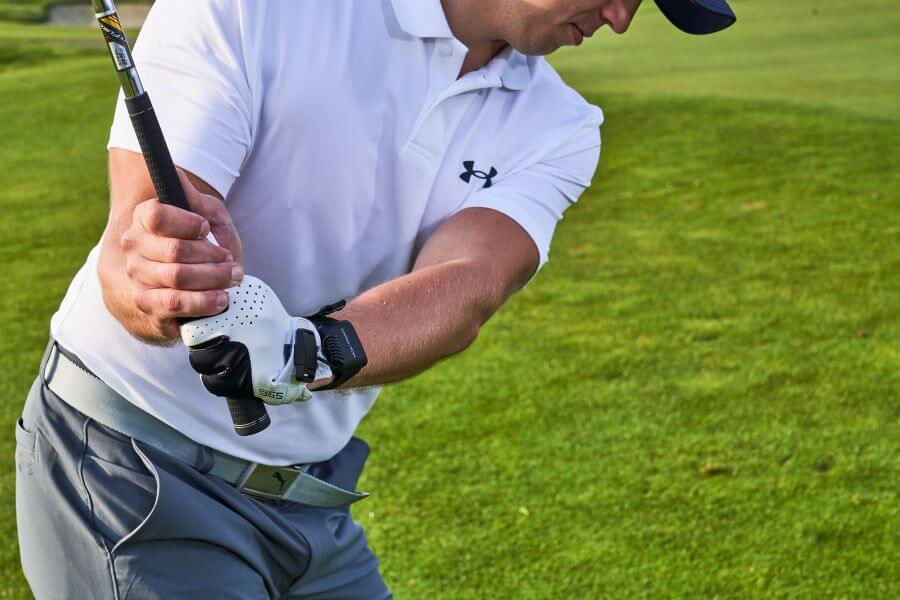
Right Hand and Wrist
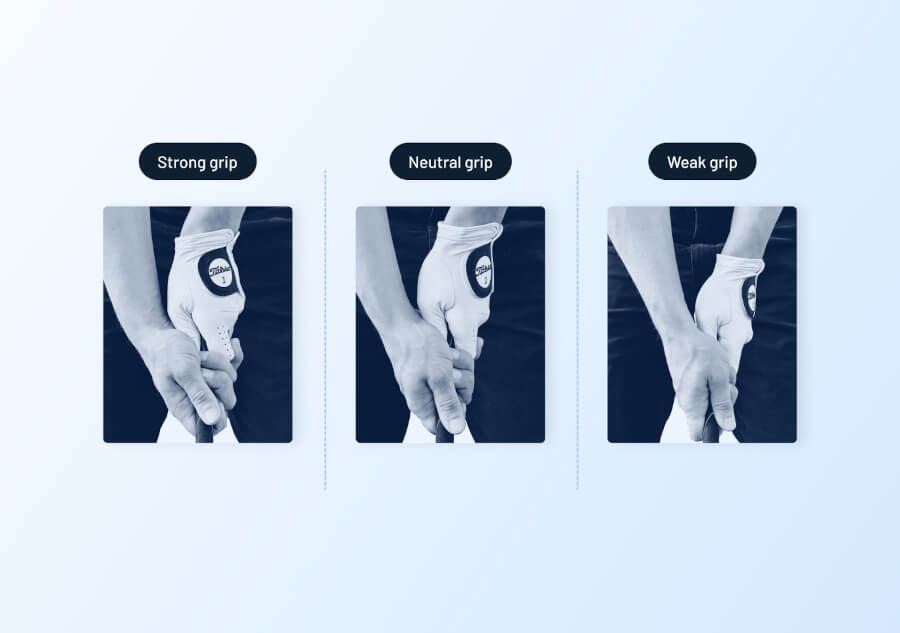
As I discuss the right hand in the backswing, I am going to do so with the consideration of your grip being neutral.
As you swing back to the halfway back position, the palm of your right hand should be pointing up at about 45 degrees. To achieve this, think of the palm of the hand being in-between facing the ground and facing the sky.
This gets your wrist extended or cupped as you go back. (A good position for the trail wrist.)
You will want to maintain this positioning in the backswing with the right wrist and hand. Wrist extension and flexion that stays consistent from setup to the top of the backswing is a sign of the better player.
Proper extension ensures a flatter lead wrist at the top and the proper amount of rotation in the hands.
That is key in having good clubface control. This hand position with the right hand also forces your right elbow down (instead of out or to the side), which aids in keeping your arms connected to the body.
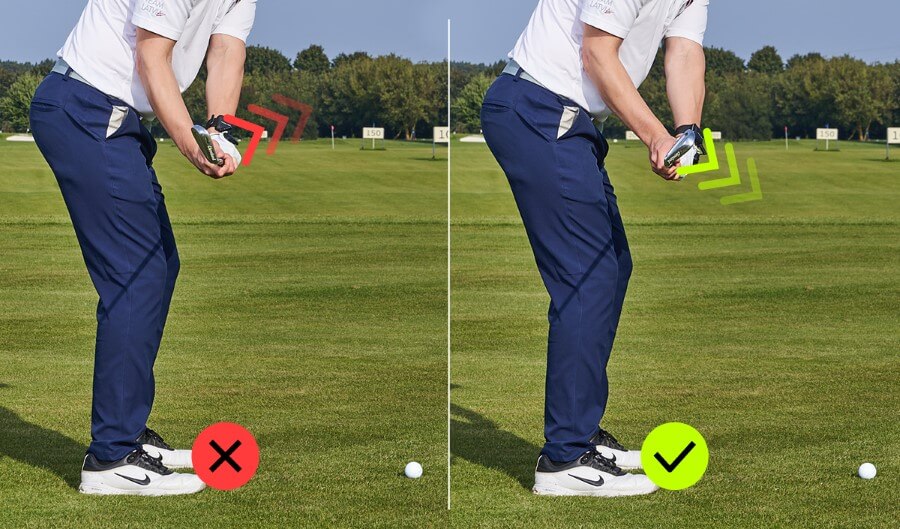
Right Elbow
As you may recall, the positioning of the right elbow at setup was slightly bent and pointing to your right hip.
As you go back, you want to continue to have the elbow pointing towards the right hip as it rotates back.
That inner elbow pocket stays as it was set up. A prevalent fault of many golfers is getting that right elbow “flying” as you go back.
When the right elbow disconnects from the body, it brings in too much room for error and a typical over-the-top pattern on the downswing.
Although this is something sometimes seen with great players, such as Jack Nicklaus, it has to be timed correctly by a very good athlete in order to be effective.
Right Shoulder
I always think of the right shoulder getting high in the backswing.
Having it move up and away from my right hip and towards the target has been a thought I have held onto since my junior golf days. If I do this ,I ensure I’m not dropping or dipping, and it gets my wrist into the proper position as well.
Golf coach Eric Cogorno and many coaches agree. Check out the video below from Eric on this very subject of the right (and left) shoulder.
The Right Arm on the Downswing
Now we will look at how the right arm works into the downswing.
As you can guess, many of the things that we do in the backswing in regards to the right arm will start to work the opposite way on the way down.
As I have alluded to throughout this article, what you do at each stage of the swing, from address to the backswing, and the downswing to impact, all have an effect on one another.
So, if you are good at set-up, and good on the backswing, in theory, you should be set up well for a good downswing.
In theory. But this is golf, and there are never any guarantees.
The backswing will set you up for success on the downswing but does not always guarantee it.
Right Hand and Wrist
The right hand and wrist in the downswing play an important role in directional control as well as speed.
As mentioned previously, the right and left hand need to support one another and work together. If one takes control over the other, then there will be inconsistency in your ball striking.
The left hand, and more specifically, the left wrist, needs to be flat at impact. If the left wrist is a little flexed, this is also a good position.
This ensures that the clubface will be square at impact.
The right hand will maintain, or even slightly increase, its extended wrist position through the downswing but will gradually, very slightly decrease it into impact.
You want to feel as though you are throwing a ball with your right hand at the golf ball on the ground, at the halfway down position in your downswing. Renowned coach Mike Malaska shares this idea in the video below.
Right Elbow
The right elbow on the downswing should move down towards your right side.
As your body rotates, you want that right elbow to stay close to your side. A good checkpoint for this is having the right elbow pointed at the right hip.
You also want to have the right elbow pocket or the inner side of the elbow pointing towards the camera if you were being recorded from face on.
Right Shoulder
The right shoulder needs to move down in the downswing. It also needs to move forward as the upper body uncoils.
Moving down without moving forward creates problems, and moving forward without down is also a problem.
Many golfers get that part of the right shoulder moving down, but often do not rotate, and unwind the shoulders on the downswing nearly enough.
This video from coach Eric Cogorno breaks down this feeling with the right shoulder. He also tees up some great drills to use to help bring this feeling out onto the golf course.
The Right Arm at Impact
The moment of truth!
With the average golf swing only taking 1.2 seconds, of which approximately 75% is the back swing and 25% the forward swing, there is not a lot of time to make corrections.
If you managed to get into a good set up with the right arm, made a good backswing, and transitioned down well from the top, you should be able to deliver the club into the ball well at impact.
Right Hand and Wrist
The right hand at impact should continue to have the wrist in extension. Although the wrist may have lost a little extension from the top of the backswing, that is entirely acceptable.
You can use the HackMotion on your trail wrist to collect your trail wrist data and determine how close you are to an ideal position.
That will help ensure that the left wrist is flat, or even slightly bowed, and the hands are ahead.
The proper wrist position aids in the compression of the golf ball and proper ball flight and accuracy.
Right Elbow
The right elbow at impact should be in front of you as you rotate through.
You want to hold that feeling of driving the right elbow into the ball for as long as you can. However, you do indeed need to release the club into the ball at impact.
This means you will need to eventually extend that right arm and elbow as you get into impact.
Right Shoulder
The right shoulder needs to continue down towards the ball and rotate through.
Getting the shoulder down and moving forward allows you to get adequate shaft lean at impact. I’ve found that proper weight shift can aid in this process.
As mentioned before, we want about 10 or so degrees of shaft lean at impact. This helps us compress the ball and that is the key to solidly struck golf shots.
The video here, once again from coach Eric Cogorno, talks more about this.
The Right Arm at Release
We are now past the point of impact and into the release. If everything up to this point was done correctly, then our release should happen naturally.
You want to see your release, or the club shaft in line with your arms extended, at about 40 to 45 degrees (see video below).
Many golfers release too soon. Some actually release too late.
From there, the forearms will rotate, with the right forearm rolling over the left forearm.
Let’s break down our release, with an eye on the right arm’s role in this.
Incidentally, I do not cover a section on the finish per say, but bear in mind that all parts of the swing fall right on top of the other. So, if the release is good, then we should flow into that good, natural, balanced finish…with the right arm closing it out.
Right Hand, Elbow and Wrist
As you release, your forearms will need to rotate with the right forearm rolling over the left forearm.
To visualize this in terms of the hands, the top side of your left hand will face the ground, and the top side of your right hand will face toward the sky.
Your right elbow will follow suit and do almost exactly what the right hand did in relation to the left as you release the club.
Wearing your HackMotion and collecting trail hand data at impact will show you if your wrists are rotating as they should through the golf ball.
Watch the following video from Chris Ryan on the proper release.
Right Shoulder
The right shoulder will simply continue to turn through as you release.
The buttons on your shirt will start to point up to the sky as you rotate that right shoulder through your release and onto your finish.
You can also visualize it as your club climbing up a wall in front of you.
The video below helps explain this more.
Some Great Right Arm Drills
Now that you have a better understanding as to how the right arm moves in the golf swing, it’s time to put it to work on the driving range.
The best way to practice is to do so through drills and technology that help you achieve the correct feel of aspects of the swing.
Practice needs to be focused and dedicated.
As we looked at the role of the right arm, including the right hand, wrist, elbow, and shoulder, I gave you a very focused part of your swing.
This would be an area to dedicate some of your practice time to. The following are some great drills to help you work on that right arm.
The first drill is from PGA Professional Adam Bazalgette. His focus in this drill is the right elbow.
The next drill is from coach Dan Whittaker. He focuses on the right shoulder and how to train it in the downswing.
Martin Chuck breaks down the right hand and wrist and their role at impact.
FAQs
In case you still have a few questions about the right arm in the golf swing, here are a few of the most frequently asked questions.
What should I do with my right arm during a golf swing?
The right arm is the trail arm, and it is along for the ride in the downswing. However, keeping the right arm closer to your body can ensure a proper club path. In addition, ensuring there is some extension in the right wrist will promote a straighter and more consistent ball flight.
Which arm is dominant in downswing?
To hit a golf ball with power and consistency, the left arm needs to be dominant in the downswing. With the HackMotion, you can track and measure your wrist angles for both the lead and trail arm to see where there is room for improvement.
What does right arm do in backswing?
In the backswing, your right arm will bend, but at the same time, stay close to your body. The right arm is more bent than the left arm as it folds up on the backswing to the position at the top.
In Summary
Finally, the right hand, arm, and wrist get the attention they deserve in the golf swing. One of the best features of the HackMotion is the ability to record both lead and trail wrist data.
Some players find that it’s easier for them to feel, learn and understand when they are using the HackMotion on their dominant hand.
Head out to the range and start with this process from setup to the top of the backswing to impact. You will quickly understand the relationship with the right arm, and especially the right wrist, in controlling your golf shots.